Each regular menu item can have an unlimited number of modifier groups and unlimited modifiers per group. In addition, each group can be defined by price levels that can be used to adjust the modifier item's normal price. Each price level may be used to adjust the price up, down or no change. For example, EXTRA may add to the price of a modifier item, while NO may decrease the price of the modifier. Other modifier levels, such as LIGHT, are used as descriptors and do not change the price of the modifier. Enter a price for each modifier item's level, even if the price is 0.
Note that most menu items in the same menu category will share the same modifier groups. For example, all menu items in the Burgers category in the demo database share the same modifier groups. The entire menu category was created in less than 10 minutes by entering one new menu item (CLASSIC BURGER) and assigning the modifier groups. The menu item was then copied multiple times and the menu item copies were simply renamed and the price was adjusted for each item.
- Modifier Groups
- Menu Item Assignments
- Modifiers
- Modifier Levels
- Copy Menu Item Assignments
- Button Placement and Sizing
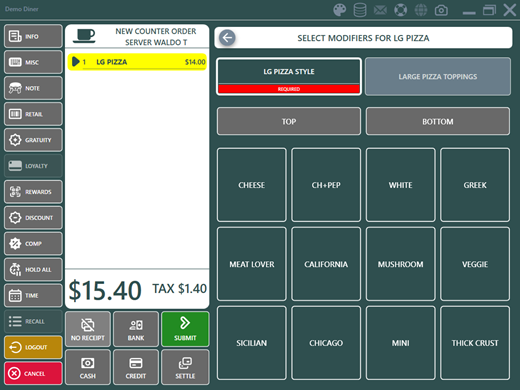
Modifier groups are used to combine individual modifier items on the order entry screen. Three modifier groups are shown in the image below: LG PIZZA STYLE and LARGE PIZZA TOPPINGS. Modifier groups that are mandatory require the user to select at least one modifier item to continue. Exclusive modifier groups do not require a selection, and a maximum of one modifier item can be selected. Modifier groups that are both mandatory and exclusive require one and only one selection from the modifier items.
In the image below, the TOP and BOTTOM modifier levels are assigned to the LG PIZZA STYLE modifier group so that 2 different pizza styles can be specified for the same pizza. Refer to the modifier levels section below for setup and usage.
Modifier Group Settings
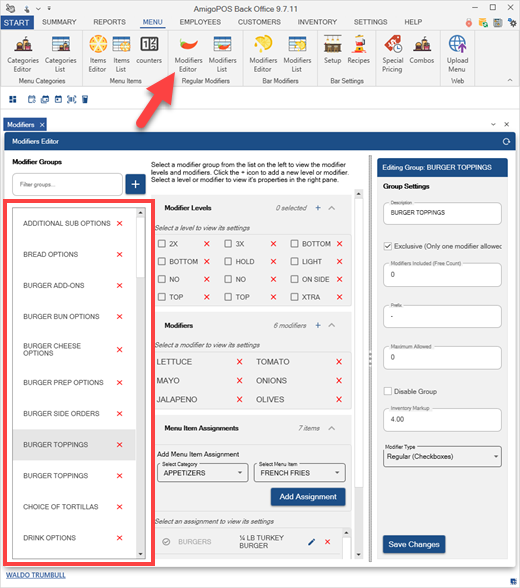
All settings for each modifier group are set in the modifier groups editor except for the MANDATORY setting, which is set for each menu item in the menu item editor, so that a single modifier group can be shared by many menu items.
- Description: Enter a brief description to appear on the order entry screen
- Exclusive: Check the box to allow only one modifier to be selected from this group
- Modifiers Included: The first x number of modifiers are free before charging for additional modifiers. Set to zero to charge for all modifiers.
- Prefix: When more than one menu item is included as a combo, enter the prefix for this modifier group. For example, when selling 2 pizzas for 1 price, enter P1 to alert the kitchen staff that this modifier group belongs to pizza 1.
- Maximum Allowed: This value determines the total number of modifiers that can be selected. For example, if set to 1, one whole or two half pizza styles in the pizza styles modifier group can be selected. Set to 0 to ignore this value.
- Disable Group: Check the box to hide this modifier group on the order entry screen
- Inventory Markup: Enter the value to use when calculating the suggested price on the inventory screen.
- Modifier Type: For use with the online web ordering interface only. Specify whether to use check boxes or radio buttons.
The modifier group default behavior allows the user to select multiple modifiers from each group. In addition, modifier groups can be set to Mandatory, Exclusive, or both Mandatory & Exclusive:
- Default: A selection is not required from this modifier group. Multiple modifier items can be selected from this modifier group.
- Mandatory: At least on item must be selected from this modifier group. The mandatory setting is applied at the menu item level so that the modifier group can be mandatory for some menu items and optional for others.
- Exclusive: Only one item can be selected from this modifier group.
- Mandatory & Exclusive: A maximum of one item must be selected from this modifier group
Exclusive modifier groups are defined by checking the box next to the Exclusive field on the Modifier Groups list. Only one item from this group may be selected for a single menu item, regardless of the number of modifier items added to this group. An exclusive modifier group is indicated by the red and gray icon on the order entry screen, as shown below. One example of an exclusive modifier group is egg preparation option which may be either scrambled, fried or basted. The server should not be able to select more than one modifier from the group.
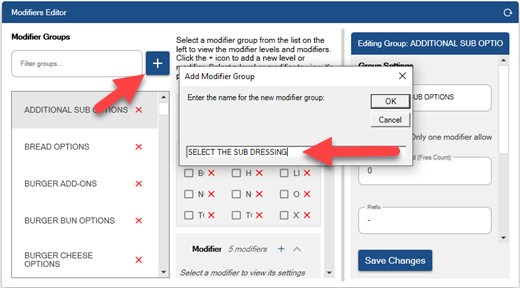
To create a new modifier group, click the + button and enter a name for the new group. Enter a descriptive modifier group name to distinguish it from other modifier groups. The modifier group name appears on the order entry screen modifier group buttons.
Modifier groups are assigned to each menu item in the menu item editor. Select the menu item and click the Modifier Assignments tab. A drop-down list displays all active modifier groups. Select the modifier group and click Add. Note that the same modifier group can be assigned more than once if required.
Mandatory modifier groups are defined at the menu item level. For example, the server may be required to specify whether the Chicken Wings should be hot, medium or mild, but may not be required to specify whether a Hamburger should be prepared rare, medium or well. In the case, the modifier group will be set to Mandatory & Exclusive for the Chicken Wings but Exclusive for the Hamburger. To set a modifier group as mandatory for a specific menu item, click the Modifier Assignments tab and click the Optional link for the modifier group so that it is displayed as Mandatory (red icon). In the image below, Wing Preparation modifier group is set to mandatory.

To add more modifiers to an existing modifier group, select the modifier group, scroll to the Modifiers section in the 2nd column, and click the + button. Enter a name for the modifier item and click ok. After the modifier is saved, select the modifier item to view its settings in the 3rd column. Click Save Changes to update the database and click the left arrow icon in the header to close the modifier item settings.
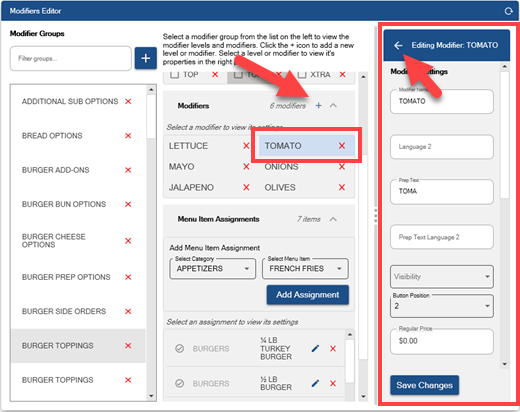
Modifier item buttons are similar to menu item buttons with a wide range of customizable features including button color, button theme and button image.
Button Text: Enter the text to display on the button and print on the customer receipt
Button Position: Select the numeric order for the button to appear on the list. Note that this value
Prep Text: Enter the text to print on the prep ticket and/or remote display
Visibility: Set the value to visible, hidden or spacer. A spacer is used to hide the button but insert a space between the previous modifier button from the next modifier button.
Regular Price: Enter the price before any modifier level is selected
Inventory Setup: A recipe can be assigned to each modifier item to properly track inventory usage
If the modifier group has associated modifier levels (described below), enter the price level for each modifier item in the group. Price levels that have a negative price (decrease the price of the menu item) will appear enclosed in parentheses. When entering a negative price, use the negative sign on the keyboard, i.e. -.50. An unlimited number of modifier items may be assigned to each modifier group.
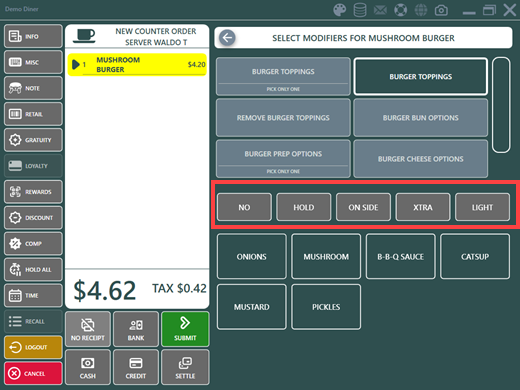
Modifier levels are used to adjust the quantity and price of modifier items. When a modifier level is selected before a modifier item is selected, the modifier level text appears directly before the modifier item text on the order entry screen, customer receipt and prep ticket. Examples of modifier levels are NO Cheese, Extra Spicy, Double Meat.
Select any modifier group to edit existing modifier levels or assign new modier levels. Check the box next to each modifier level that should appear when the modifier group is selected. Define the button text that should appear on the button by selecting the modifier level and entering text in the Button Text setting. Similar to the modifier items, new modifier levels can be added by clicking the + at the top of the modifier levels. An unlimited number of modifier levels may be defined, but use short button text when defining more than 5 modifier levels so that the text is visible on the order entry screen buttons. Click Save Changes followed by the left arrow at the top to return to the modifier group settings.
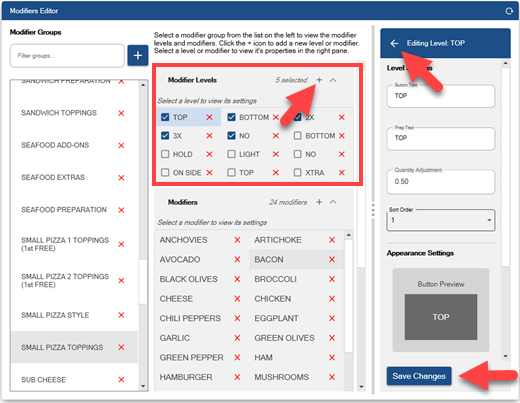
- Button Text: Enter a brief description to appear on the order entry screen button and customer receipts
- Prep Text: Enter the text to appear on prep tickets (text appears as prefix to modifier text). Leave blank to use the button text.
- Quantity Adjustment: Enter the quantity adjustment. For example, if the modifier level is half, enter .5 so so that the modifier is properly counted. This value is also used for inventory adjustment.
- Sort Order: Determines the order in which the modifier level buttons are displayed on the order entry screen.
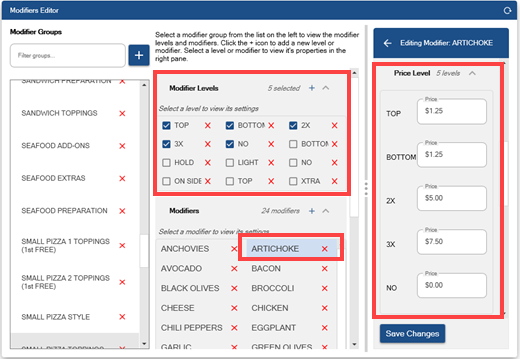
When one or more modifier levels are enabled for a modifier group, select each modifier item in the group and enter a price for each modifier level under the Price Levels section.
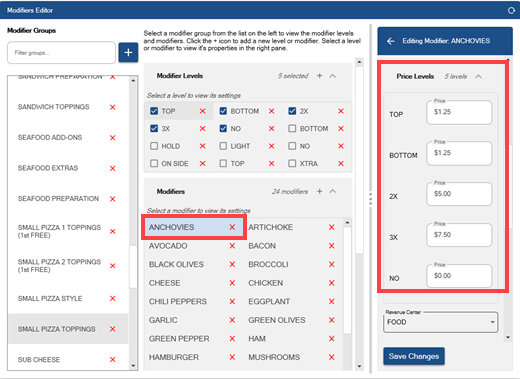
Modifier level buttons appear above the modifier item buttons on the order entry screen. To enable a different price level for a modifier item, select the modifier level button first, then select the modifier. If a mistake is made, select the same modifier to remove it from the order.
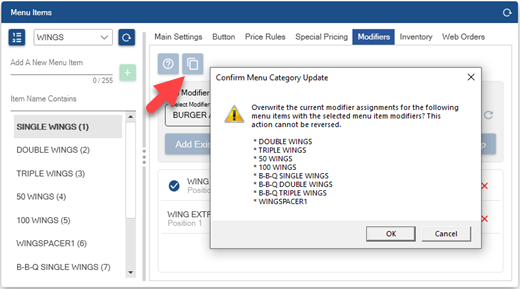
In many menu designs, all menu items in a menu category will share the same modifier group assignments. For example, all dinner entrees may include the choice of potato, soup or salad, etc. In this case, modifier group assignments can be copied to all menu items in the current menu item's category by opening the menu item in the menu item editor. Click the Modifier Assignments tab and click Copy To All. A list of all menu items in the current menu items category is shown. Click Yes to confirm. All existing modifier group assignments for the other menu items in the same category are deleted and the current list of modifier groups, including the sort order and mandatory status of each group, is copied to each of the other menu items in the same category.