Custom reports require a direct database connection, both in back office and in the report designer. Complete the following steps to allow remote connections in SQL Server.
- Enable Mixed Mode Authentication
- Create a new database user
- Enable the TCP/IP protocol
- Add Firewall exception
- Restart SQL Server
- Configure the report designer database settings
- Configure the report viewer database settings
Enable Mixed Mode Authentication
Open the data service application and click SQL Query under the host settings tab. Copy and paste the highlighted text. Run the script, to enable mixed mode authentication. The change will take effect after SQL Server is restarted as described below.
USE [master]
GO
EXEC xp_instance_regwrite N'HKEY_LOCAL_MACHINE',
N'Software\Microsoft\MSSQLServer\MSSQLServer', N'LoginMode', REG_DWORD, 2
GO

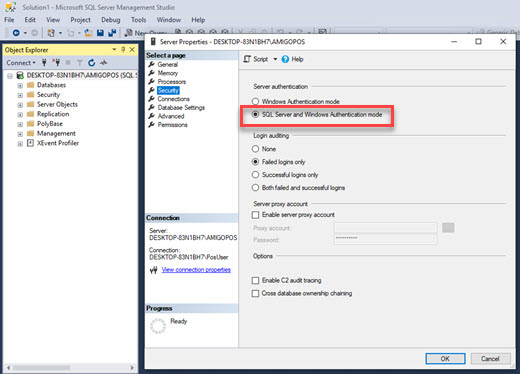
Mixed mode authentication can also be enabled from SQL Server Management Studio. Right-click on the server instance and select Properties. Click Security and change the mode from Windows Authentication mode to SQL Server and Windows Authentication mode.
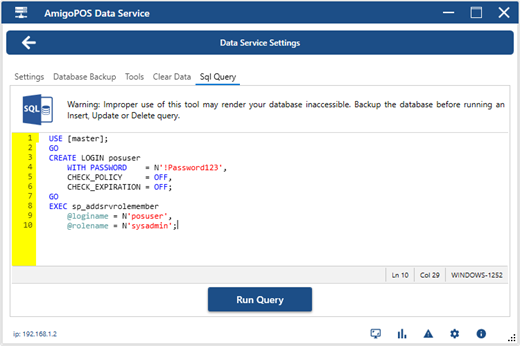
Open the data service application and click SQL Query under the host settings tab. Create a new script and copy/paste the highlighted text. Run the script, which will create a new user with permission to access the server remotely. Note that in the script below, the new user name is set to posuser and the password is set to !Password123. Change both values to suit your requirements.
USE [master];
GO
CREATE LOGIN posuser
WITH PASSWORD = N'!Password123',
CHECK_POLICY = OFF,
CHECK_EXPIRATION = OFF;
GO
EXEC sp_addsrvrolemember
@loginame = N'posuser',
@rolename = N'sysadmin';
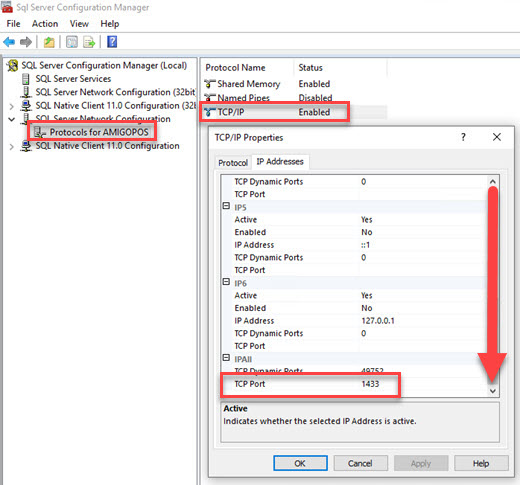
Enable the TCP/IP protocol in SQL Server Express
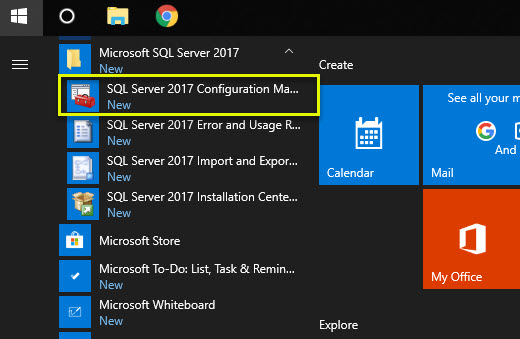
On the main pos station where SQL Server is installed, run the SQL Server Configuration Manager from the Microsoft SQL Server program group in the Windows Start Menu.
Select SQL Server Network Configuration and click on Protocols for YourInstanceName. Double-click on TCP/IP in the right pane and set Enabled to Yes. Click the IP Addresses tab, scroll to the bottom and set the value of IPAll/TCP Port to 1433.
On the main pos station where SQL Server is installed, click Windows Start or the taskbar search icon and type cmd. Right-click and select Run as administrator. Copy/paste the script below and click Enter to add a firewall exception for port 1433.
netsh firewall set portopening protocol = TCP port = 1433 name = SQLPort mode = ENABLE scope = SUBNET profile = CURRENT
<
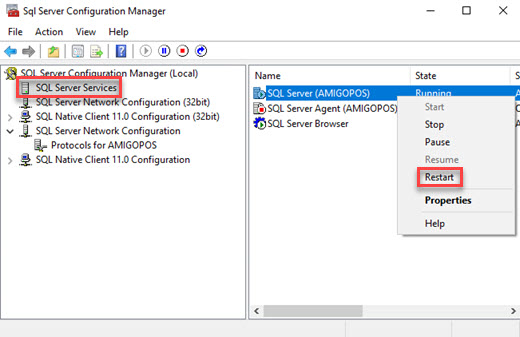
On the main pos station where SQL Server is installed, run the SQL Server Configuration Manager from the Microsoft SQL Server program group in the Windows Start Menu. Select SQL Server Services, right-click on SQL Server and restart SQL Server to begin using the TCP/IP protocol.
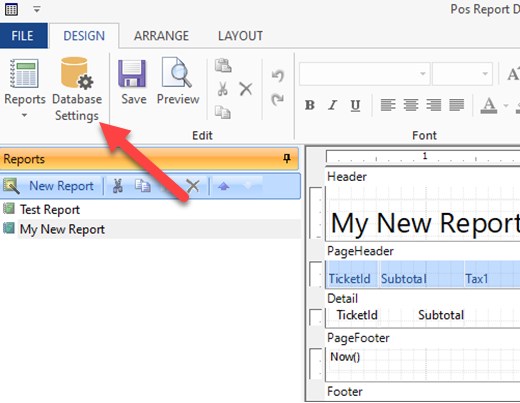
Report Designer Database Settings
Run the report designer and click Database Settings.
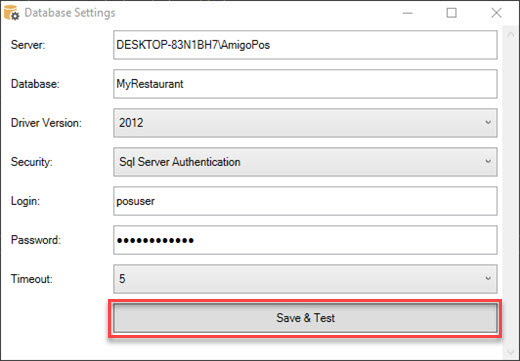
Copy the server and database settings from the data service application Data Service/Settings tab on the main pos station, select SQL Server Authentication, enter the username and password from step 2 above and click Save & Test to verify that the connection parameters are correct.
Report Viewer Database Settings
Install SQL Native Client 2012 or later on any computer that is used to view custom reports in back office. Download SQL Native Client 2012 from Microsoft at https://www.microsoft.com/en-us/download/details.aspx?id=50402.
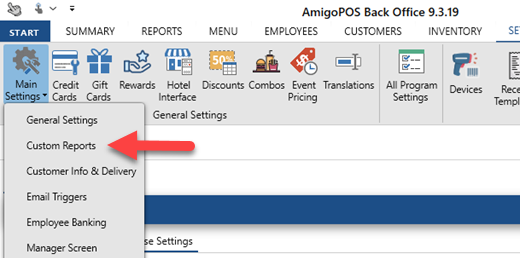
Run back office | settings | main settings | custom reports and select the Database Settings tab. Copy the server and database settings from the data service application Data Service | Host Settings tab on the main pos station, select SQL Server Authentication, enter the username and password from step 2 above, select the SQL Native Client version and click Save & Test to verify that the connection parameters are correct.